

One of my co-workers (and friend) invited me to her and her husband's house warming party. They bought a beautiful home and have been working so hard on updating it and making it their own. I was very excited to see their touches and celebrate a happy time with them... but being in the process of trying to buy my own home leaves me in a position where buying a housewarming gift wouldn't have been easy (smart) to do. But of course I didn't want to go empty handed either. I figured I would use one of my hobbies, couponing, to help with their gift. And to package their home good products all together, I would use some recycled materials around my apartment.
About the products: I coupon and get products for as close to free as I possibly can... so these products were easy for me to come by and I knew they could help others who were settling into a home.
When I first moved out into my own apartment, my mom gave me a bag of products with soap, deodorant, and medicine, just to name a few. I loved that she did this because after just spending all my money on a mattress & box spring, security deposit, and first month's rent... I was left with pretty much nothing. It was nice to know I didn't have to spend any more money for a little while by using the products my mom gave me.
To make sure I still have a savings account once I buy a new home, I ended up spending only approx. $5 (price break down below) on this House Warming gift. It was all part of my stockpile. Plus I gave a bottle of wine, because when in doubt about gifting gas x to a friend, bring a bottle of wine.
Step 1: Find an appropriately sized cardboard box from a recent online purchase.
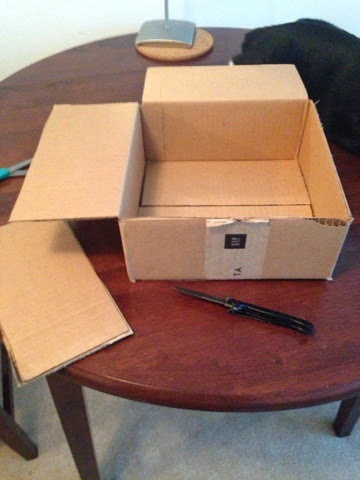
Step 2: Use a razor blade the score the box flaps form the inside and outside. Don't use your pocket knife to do this unless you can't find your razor blade. I know someone who would be very angry with me for dulling my knife for this project lol.

Step 3: Once your flaps are scored, with a little tug, the flap should come right off.

Step 5: Lay out your wrapping paper and cut a big enough piece to cover the edges of your box. I got my wrapping paper from Home Goods. Go to Marshalls, TJ Maxx, or Home Goods for really trendy (and affordable) gift wrap!

Step 6: I ended up cutting the wrapping paper into a cross shape + but I ended up with corners revealed... which I didn't mind so much... but I thought afterwards that I should have not cut the wrapping paper flesh with the side of the box; I should have made the cuts a bit wider on two of the sides so that the paper would overlap and would conceal the edges. Seems obvious, but I didn't think of it at the time.

Step 7: Tape down your paper.

Step 8: Use a scrap piece of wrapping paper to cover the bottom of the box.

Step 9: Add your products. I started by adding my bigger and taller products towards the back of the "basket" and added the packing paper the box came with to provide some elevation for the other products to settle into.
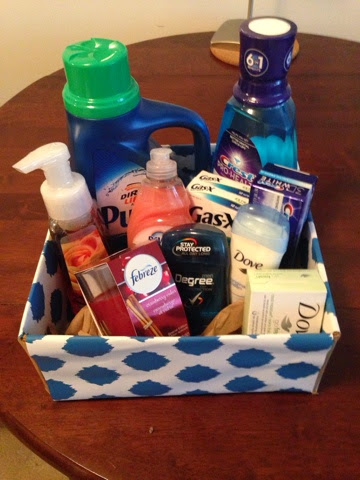
At this point, I was still able to see the brown packing paper in the front left corner and next to the dove soap... so I needed to fix that.

I fixed it by adding a sponge and laying the Dove soap on its side.
Here is an estimated cost per item:
Purex $1
Bath and Body Works Hand Soap $3
Febreze Candle $1
Dawn Soap $.20
Sponge (from 6 pack from Dollar Tree) $.16
Dove Soap $.50
Deodorants Free
Mouthwash Free
Toothpaste Free
Gas X Made me about $2 cash for every 3 boxes (which is why I have so much of it)
Interested in couponing (and other money saving tips)? Follow me on insta @chrasscoupons
You, too, can make something like this... all you need is a box, wrapping paper, and a theme! Tools, Hair Products, Scent Basket, Stationary Basket, Back-to-school, etc.
No comments:
Post a Comment