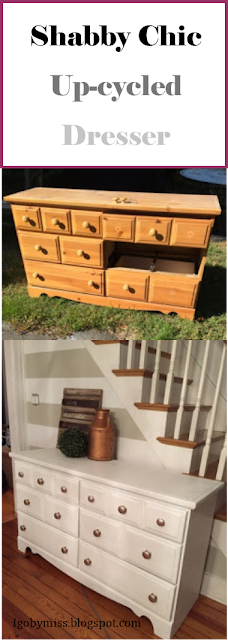
From country pine to shabby chic... Watch how this piece destined for the trash ended up making me money.
When I first acquired this piece from the trash, it was missing a knob, had dog fur inside it (with a slight pet odor), had a partial sticker along the side, drawers needed to be hinged on the tracks correctly, and was knotty pine.
I removed all the drawers and added baking soda to the drawers to absorb some of the slight odor which I later vacuumed out with a shop vac. I also vacuumed out any dust/debris from the inside/back wall of the dresser.
I then took the old knobs and new knobs and stuck them in an egg carton to be better coated by the rose gold spray paint.
I looked into buying new knobs, but knobs are very expensive! About $3 each! So I grabbed two double packs of smaller wooden knobs to use on the top drawers so I could move one of the big knobs down to the lower right hand corner where the knob was missing from. This way the dresser would look symmetrical and the out of pocket expense for the knobs was about $1 each bag and about $6 for the spray paint. Here they are after their first or second coat.
See the sticker? I sanded that guy down just enough before I painted over it with my handmade chalk paint. I store my chalk paint in a clean pickle jar and emptied a little at a time into an old yogurt container which had a wider opening for my brush to stick in.
After 1 coat.
After 1 coat.
Coat 3
Close up of how the knobs looked against the white drawer.
Check out the finished product with a little staging to amp up the shabby chic/farmhouse/imperfect charm. Posted it online to sell and within less than 24 hours, I had 17 people in line to buy this dresser. It was gone 2 days later. The new owners of this dresser are going to use it for a little girl's room with the top of the dresser acting as a changing table. I wish I was able to salvage old things, give them new life, and sell them every day... but I can't. So I blog about it instead to fill in the gaps. See you for my next project... Lots of freebies in the works!!


No comments:
Post a Comment