Saturday, August 9, 2014

Importance of ShapeWear

Lose weight in a matter of minutes! 

See what a difference a pair of high-waisted control top underwear can do for your entire outfit.  If you're like me and don't like the way your stomach looks in fitted clothing, invest in a couple pairs of these control top underwear.  It helps you "lose weight." I got mine for $7.99 for the 2 of them at TJ Maxx.  Some of these clothing items are part of my Back-to-School Teacher Clothes Guide.  

Thursday, August 7, 2014

Back to School Shopping 2014

I have a love/hate relationship with this time of the year.  I love it because it is still summer and it is time to buy some new clothes to update my wardrobe for the new school year ahead.  I hate it because this is the time of the year where summer is winding down which means school starts soon.  Plus as much as I love gaining new pieces for my closet, I hate losing the money out of my pocket.  I try to find a balance and buy sale items that I know I can wear lots of different ways.  Also, use Pinterest as a tool to find inspirational ideas to transform your new pieces into entire outfits.  Follow me here.

Black and White Leopard Print Pants
From Marshalls for $24.99
Seems kind of bold for work, right?  Wrong! Look below at the inspiration photos I found:
Inspiration Photos with shirts tucked in.
Inspiration Photos with shirts un-tucked.

Navy, Pink, and Cream Stripe Dress
J. Crew Factory Valued at $118 bought for $37.21 including shipping
Final Sale - bought in size 14 (based on their sizing chart), but it's way too big.  I need to get it altered.  I bought it with PayPal money, so it's kind of like it was free anyway.  
Inspiration for this dress was J from Jseverydayfashion.com
Will probably look nice with a bright pink cardigan or wrap for the fall and spring when the weather is cooler.

Dark Olive Green Suburst Sheath Ivanka Trump Dress
From TJ Maxx $49.99
I bought this dress to wear to a wedding, but I will also be able to wear it to school.

I will wear this with gold strappy heels to the wedding, and will wear with nude ballet flats or nude wedges to school.  You could buy this from Lord and Taylor for full price at $134.00 in the color black... or you could go check your local TJ Maxx.

Zambia Pencil Skirt
Banana Republic Factory $37.21 (including shipping) SOLD OUT
Here are some inspiration photos for how I can wear this black and white skirt.


Alyx Neutral and Orange Striped Dress
JCPenney $16.99 SOLD OUT
I actually bought this before the end of the school year, but I never wore it yet.
I could easily wear this dress into the fall with a pair of black stockings and a cardigan.

Slip/Shapewear
TJ Maxx $16.99
This is the most important purchase I made.  This slip/shapewear will allow me to wear all my dresses that could use a little smoothing underneath.  If you only have a little bit of money to spend for the new school year, I highly recommend putting your money towards shapewear.  It will allow you to wear all your old items confidently instead of buying more things that you still may not be happy with.  

Shapewear Underwear (Black and Nude)
TJ Maxx $7.99
Again, this is the most important purchase that will allow me to wear all my pencil skirts with a smooth finish.

Total Spent: $191.37 all together; $174.38 not counting the Alyx Dress; $137.17 not counting the Alyx Dress or the J. Crew Factory Dress.  

What's left?  Beige Cardigan, Basic White Tee, Maroon/Wine Colored Jeans, Army Green Canvas Vest

Coming soon: The importance of Shape Wear with examples  Done - Check it out.

Saturday, August 2, 2014

How to Make a Gift Basket


One of my co-workers (and friend) invited me to her and her husband's house warming party.  They bought a beautiful home and have been working so hard on updating it and making it their own.  I was very excited to see their touches and celebrate a happy time with them... but being in the process of trying to buy my own home leaves me in a position where buying a housewarming gift wouldn't have been easy (smart) to do.  But of course I didn't want to go empty handed either.  I figured I would use one of my hobbies, couponing, to help with their gift.  And to package their home good products all together, I would use some recycled materials around my apartment.  

About the products:  I coupon and get products for as close to free as I possibly can... so these products were easy for me to come by and I knew they could help others who were settling into a home.  
When I first moved out into my own apartment, my mom gave me a bag of products with soap, deodorant, and medicine, just to name a few.  I loved that she did this because after just spending all my money on a mattress & box spring, security deposit, and first month's rent... I was left with pretty much nothing.  It was nice to know I didn't have to spend any more money for a little while by using the products my mom gave me.  
To make sure I still have a savings account once I buy a new home, I ended up spending only approx.  $5 (price break down below) on this House Warming gift.  It was all part of my stockpile. Plus I gave a bottle of wine, because when in doubt about gifting gas x to a friend, bring a bottle of wine. 

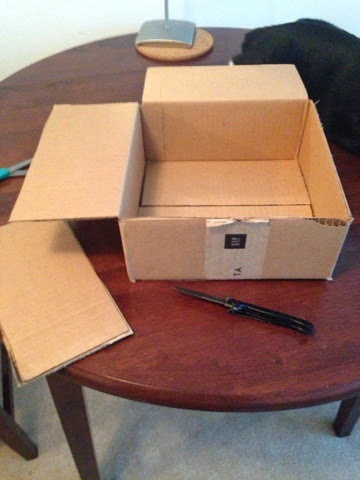
Step 1: Find an appropriately sized cardboard box from a recent online purchase.

Step 2: Use a razor blade the score the box flaps form the inside and outside.  Don't use your pocket knife to do this unless you can't find your razor blade.  I know someone who would be very angry with me for dulling my knife for this project lol.  

Step 3: Once your flaps are scored, with a little tug, the flap should come right off.
Step 5: Lay out your wrapping paper and cut a big enough piece to cover the edges of your box.  I got my wrapping paper from Home Goods.  Go to Marshalls, TJ Maxx, or Home Goods for really trendy (and affordable) gift wrap!
Step 6:  I ended up cutting the wrapping paper into a cross shape + but I ended up with corners revealed... which I didn't mind so much... but I thought afterwards that I should have not cut the wrapping paper flesh with the side of the box; I should have made the cuts a bit wider on two of the sides so that the paper would overlap and would conceal the edges.  Seems obvious, but I didn't think of it at the time.  
Step 7: Tape down your paper.
Step 8: Use a scrap piece of wrapping paper to cover the bottom of the box.  
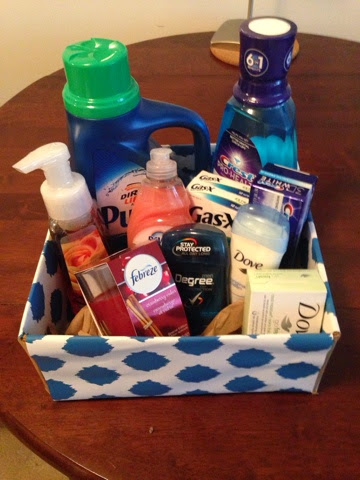
Step 9:  Add your products.  I started by adding my bigger and taller products towards the back of the "basket" and added the packing paper the box came with to provide some elevation for the other products to settle into.  
At this point, I was still able to see the brown packing paper in the front left corner and next to the dove soap... so I needed to fix that.  
I fixed it by adding a sponge and laying the Dove soap on its side.   

Here is an estimated cost per item:
Purex $1
Bath and Body Works Hand Soap $3
Febreze Candle $1
Dawn Soap $.20
Sponge (from 6 pack from Dollar Tree) $.16
Dove Soap $.50
Deodorants Free
Mouthwash Free
Toothpaste Free
Gas X Made me about $2 cash for every 3 boxes (which is why I have so much of it)
Interested in couponing (and other money saving tips)?  Follow me on insta @chrasscoupons

You, too, can make something like this... all you need is a box, wrapping paper, and a theme!  Tools, Hair Products, Scent Basket, Stationary Basket, Back-to-school, etc.  


Tuesday, July 22, 2014

Chalk Board Re-Design


Total Time: Less than 2 hours (including prep and clean up)
Total Spent: $30 approx.

I hate chalk!  I won't touch it.  I didn't even have chalk out on my chalk ledge this year.  I used my chalk board as a magnet board and just hung visuals from it.  But I have been seeing ultra trendy chalkboard designs that I think would be a great visual aid to incorporate into the classroom.  I also learned about chalk markers which throws the whole idea of having to touch chalk out the window.  Win-Win.  Except - my boards are green and chalk markers aren't going to look as nice on top of green.  White won't even pop that much because the contrast won't be as strong as if it were black.  So I resolved to spend the money and re-design my chalk boards from blah green to pure black.  Cute Boards and No chalk residue on my fingers.  Check out my inspiration photos from my Pinterest account (Follow my Chalkboard Board): 
Instead of baby updates, I will have things such as upcoming due dates & advertisements for books of the month on my chalkboard.

HERE'S WHAT YOU'LL NEED:
Chalkboard Paint
$10 Home Depot
(Ask them to shake it for you with the paint machine.  Lol I Just envisioned the paint department worker dancing with the paint machine.  Oh vague pronoun... Seriously though, the paint department associate told me that sometimes the paint in boxes sit a while and aren't the right consistency without it being shaken before using.)
Blue Painter's Tape
$6

Mini Rolling Kit
$7
(My kit came with a roller, pan, and a small brush.  I also bought a bigger briush too, but ended up not really needing it to get the project done.  A roller and a small brush for the corners are good tools for this project.)

(Save your Home Depot bag to line the tray for easy clean up! I did this, as shown in the pics above of my brother painting the board. Idea from Pinterest.)

Before you get started with your project, get permission from your administrator and possibly from your Head of Maintenance.  Because these two people at my school had confidence in my project, I wanted to make sure I did exactly as I said and to not make excess mess for anyone.  

Remember to have a drop cloth to protect the floor (Shower Curtains from the Dollar Store can work or do as I did, and just use big sheets of post it papers - not because I wanted to be wasteful, but because I forgot to stop at the Dollar Store before hand.)  I also placed a protective layer on my smart board just in case of any paint splatter.  Also notice that I already taped off the board and smart board to make sure I only got paint where I wanted it.  My brother helped me with this project.  We love DIY.

We painted mostly in one direction - vertically.  And we used the small brush to get in the corners.  We also debated on how to approach the little green space beneath the SMART Board on both sides.  I was able to sneak in there with the small brush without getting paint on the SMART board.  Now my board is updated and cohesive!

This pic is the brightest pic my phone took of the whole room even though the blue tape is still up, and my brother is fixing something.  
IMPORTANT: Peel the blue tape before the paint dries or else the paint will peel with the tape!!
Voila!  A job well done!  Now my bulletin boards really pop and now I can get started with chalkboard designs that will pop as well!
Next up, a desk skirt and paint for the bulletin board strip above the chalkboard and on one of my walls.  The bulletin board is currently a yellowy-green-brown shade. Ilk.  

Thursday, July 10, 2014

Where have you been my whole teaching career? Text Features Graphic Organizer

Have you ever thought, "Gee, it sure would be nice to have a visual representation of all the parts of literature!"  Such as figurative language, point of view, and character all on the same graph showing the correct relationship to one another... I have been thinking this for a while and I'm not quite sure why I haven't made a graphic organizer like this for my own classes, but alas, I don't have to re-invent the wheel because someone (Mr. Turner - click image for his class site) already invented it: 
Love, right?  I am probably going to print, laminate, and display this organizer in my classroom in addition to hand one of these out to every single student I meet.  Even in the summer, we never stop planning, do we?

Thursday, July 3, 2014

'Merican Pride Tee

This look is inspired by one of my students.  She wore a shirt just like this to a Zumba fundraiser - and I've wanted to make my own ever since.
Step 1:  Buy an over-sized (1 or 2 sizes bigger works well) USA/4th of July inspired Tee.  I found this one at Walmart for $4.98.  Old Navy usually has a lot of these shirts too.
Step 2: Try the shirt on and mark with a pencil/safety pin where you want the strands to go up to.  You can make it as high or low as you'd like.  Remember the higher you go, the more midriff exposure there will be. (You could make it go really high and wear a tight blue tye-dyed tank underneath... so you get hints of blue).  
Step 4: Cut the shirt upwards into 4 sections: Front middle, back middle, left side, right side.
Step 5: Work with only one of your quarter sections at a time.  For every original quarter section, cut in half, and cut those in half again. (See above). Then I cut 3 strands for each new quarter as you can see above.  So if we are looking at only the original quarters from the first pic of the cut shirt, you will get 12 strands per quarter.  In all, you will end up with about 48 strands on the entire shirt.  OR cut it however you'd like.  Cutting it into sections helped me keep it all even.
Wear with jean shorts, or a bathing suit bottom!  You can get crafty and add beads to every strand, or knot every strand, or cut the strands smaller and braid them... Options are endless.
I'm ready for a picnic and fire works.  Plus, I could wear this tee all summer long and show (what's left of) my 'merican pride.