Tuesday, October 20, 2015

Basic Dresser Remodel DIY

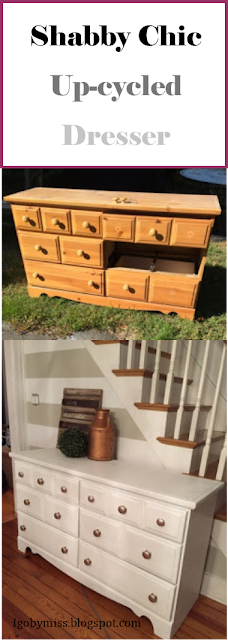
From country pine to shabby chic... Watch how this piece destined for the trash ended up making me money.

When I first acquired this piece from the trash, it was missing a knob, had dog fur inside it (with a slight pet odor), had a partial sticker along the side, drawers needed to be hinged on the tracks correctly, and was knotty pine.


I removed all the drawers and added baking soda to the drawers to absorb some of the slight odor which I later vacuumed out with a shop vac.  I also vacuumed out any dust/debris from the inside/back wall of the dresser.
I then took the old knobs and new knobs and stuck them in an egg carton to be better coated by the rose gold spray paint.  
I looked into buying new knobs, but knobs are very expensive! About $3 each! So I grabbed two double packs of smaller wooden knobs to use on the top drawers so I could move one of the big knobs down to the lower right hand corner where the knob was missing from.  This way the dresser would look symmetrical and the out of pocket expense for the knobs was about $1 each bag and about $6 for the spray paint.  Here they are after their first or second coat.

See the sticker?  I sanded that guy down just enough before I painted over it with my handmade chalk paint.  I store my chalk paint in a clean pickle jar and emptied a little at a time into an old yogurt container which had a wider opening for my brush to stick in.
After 1 coat.

After 1 coat.

Coat 3
Close up of how the knobs looked against the white drawer.

Check out the finished product with a little staging to amp up the shabby chic/farmhouse/imperfect charm.  Posted it online to sell and within less than 24 hours, I had 17 people in line to buy this dresser.  It was gone 2 days later.  The new owners of this dresser are going to use it for a little girl's room with the top of the dresser acting as a changing table.  I wish I was able to salvage old things, give them new life, and sell them every day... but I can't. So I blog about it instead to fill in the gaps.  See you for my next project... Lots of freebies in the works!!

Wednesday, October 14, 2015

Vintage Window DIY

Need a charming piece to tie your home decor together?  Look no further than the trash!  I lucked out and found about 6 of these 8 paned vintage style windows.  

Time: 2 hours
Materials: Window, wire bristle brush, painters tape, white vinegar, paper towels, sanding block, chalk paint, paint brush


As you can see, the windows were very dirty and a little flaky.
I took a bristle brush and brushed away a lot of the flaking paint.  I used my sanding block lightly.  Then I started to clean the window with a white vinegar solution. Look at the top left hand corner pane compared to the others!
Finally clean!
Next, I taped off each pane.  This would have been a lot easier if I used an exacto knife for the corners, but I didn't have one available. 
Then I started painting the front with a white chalk paint.  The paint is Greek Villa by HGTV for LOWEs.  But I made it a chalkboard paint with this recipe that I had leftover from my beautiful french provincial dresser remodel.
All painted.
Peel away tape as soon as you are done painting.  If the paint dries on the tape, the tape may pull the paint when you peel it away.  TIP: If you notice that paint has leaked onto the window... have no worries.  Take a tiny makeup brush and dip it into acetone.  The acetone will remove the paint off of the glass.
I left the back alone because the caulking looked fragile.  I cleaned the back, but didn't paint it.  This was more than me being lazy, it actually keeps the integrity of the vintage/antique feel of the window.
A couple lovely shots of my work inside my home.
Do you see how the light is reflecting off of the clean window panes?  This is a great alternative to a mirror to open up your small spaces.

I am very pleased with this project.  But since I have 5 more windows... I have a a few more ideas up my sleeves (all courtesy of pinterest). Click on the image to go to the pin.

Monday, October 12, 2015

Free Trash Finds

It was bulk trash pick up again in my area.  Which, for me, meant a week of digging - through trash. Ok, not literally... but I just went around the neighborhoods and looked at the piles at the curb.  Usually, if the trash was stacked neatly, there was a treasure hidden there.  If the pile was thrown about, chances are it really was junk.  For this post, I am going to write a dollar amount for how much each of these items might be worth as is or with a little retouching so I can measure how much I gain by recycling!

One of my favorite scores was this white wooden bench.  The bench could use a touch up with paint, but it works for now with my front porch.  I like how the bench has spokes just like my porch.  It also adds that historic charm I like for my home. Estimated Value: $50


This piece with the mantle ledge will be transformed into a chalkboard dinner menu for my dining room.  Estimated Value with refinishing: $50-$75
This is sort of what I am thinking. (Idea from Pinterest)
I can't take credit for finding this awesome piece, but I have trained my partner in crime's eye to scope out vintage/antique pieces.  This washboard is actually made of glass rather than metal.  From a quick google search, I found that this was likely created/used during the WWII era since metal was on short supply. But I plan on adding this one to my collection to create something I found on pinterest for my laundry room. Estimated Value: $30
Inspiration 

I didn't take a pic of the next item, but I found 4 long, white shutters.  I thought I could sell them to someone to use as a headboard, but then I came across these cool ideas from Pinterest. Estimated Value: $40 

I always keep my eye out for old multi-paned windows because there are so many projects that I can do with them.  I hit the jackpot and found about 6.
I cleaned, scraped, sanded, and painted this guy and created a layering masterpiece.  If you want to see how, click here for my Vintage Window DIY post. Estimated Value after refinishing: $30 (x 6)
And for a really big treasure... I have been wanting a canopy bed/couch for the outdoors all summer, but the price tag held me back.  Most of the pieces I found cost around $900.  Well look what I found - again I should be giving credit to my chauffeur!  It came with the shade too, but I didn't assemble it yet (since we are changing seasons anyway).  All the cushions were still in original plastic bags.  I really don't know why someone threw this out.  It is in brand new condition.  However, it is missing the other half of the semi-circle. Estimated Value: $450
See what I mean? Below overstock.com is selling a similar one for $950.
Estimated Value of all the treasures I found: $800 - $825!!!
Want to see what treasures I found last time? Click here.