Thursday, December 17, 2015

Further Education for Future Plans Announcement

A repetitive theme here on the blog lately has been about homes.  I've been watching HGTV religiously for more than 10 years.  I remember back when Carol Duvall and Candace Olson were HGTV celebs... I may not have formal training in interior design (yet), but I have sure developed a passion for home design and homes.  A perfect Saturday afternoon would consist of attending open houses just because I want to know what the inside looks like.  I want to know what kind of floors the house has, what kind of counters are in the kitchen, and how many closets are inside too.  I have been obsessed with homes, layouts and decor, for a majority of my life. 

I am a Virgo and I like certainty... the real estate market doesn't provide that.  Teaching does.  And I had to go to college for something, so I chose teaching.  And while teaching has it's benefits, literal benefits, vacation days, etc., I have not been fueling my passion, until 2 weeks ago when I took the plunge and enrolled in Real Estate School.  I still have hours to fulfill, and tests to take, and a broker to find, but I will be a Real Estate Agent soon.


What this means, to start, is that I will still be a teacher but with a Real Estate License.  I can't afford to abandon my career that pays my own mortgage, but this is the first step to fulfilling my passion.  I don't even know if being a Real Estate Agent is going to fill the void, but I think it's a start on my multi-tiered real estate life goals.

So this is my big announcement to friends and family: If you are thinking about listing your home or finding one, let's see if our timing matches up.  I will be a newbie in a field of many experienced (sometimes competitive) agents, but I am obsessed with homes and will be very excited to help you find one of your own that will work for you and your loved ones which will yield you the results you are looking for.

This house is what my dreams are made of.  If I could, I would totally buy this property in New Haven. #goals


Thursday, November 26, 2015

1 Year Home Anniversary (Before & After)

It couldn't be a better day for my 1 year anniversary in my first home: Happy Thanksgiving! I am still so thankful for this 115 year old beaut. To celebrate, I'm going to take you on a room by room updated tour (even though some rooms are missing because I didn't have time to clean them enough and get the photo during the daylight).

I struggle with naming this post "before and after" because as you will see, some of my house is far from the after stage. So this post is more like a Before and Now post. 


Half Bath

I painted the walls, replaced the faucet & toilet, and changed the mirror.

I still need to paint the baseboards, window trim, and door/trim... And obviously break off the excess shims that have been there for 9 months.

Laundry Room
This area off the kitchen used to house the kitchen sink. With no room for a dishwasher on either side, this had to be moved.  I know buyers don't prefer laundry machines in the kitchen, but I think this is better than the laundry being in the basement. 

I still need to repair the hole that was cut out for a security camera, paint, and hang my collection of washboards.

Master Bedroom
One of the first things I did in this house was remove the old carpet that was in this room. I had one of the windows replaced, and I painted the walls. I had laminate floor installed as well. This is my favorite room! I don't know if it's because of my French provincial dresser or the consistent color palette, but it's overall relaxing. 

I still need to paint baseboards & door trim, paint walk in closet because it looks like a haunted house in there, replace light fixture, and replace light switch plate.

Guest Bedroom 
I know the after isn't very pretty, but I made up for it with an image of my eldest  child. In this room, all I did was rip out the carpet and replace with laminate flooring.

I still need to paint this entire room and closet (and unpack?).

Kitchen


This kitchen had a major overhaul. The stove was moved and a sink and dishwasher added. I had an additional counter space made and topped it all off with granite counters. Rotted floors were replaced and a heat vent moved. The floors were refinished along with a new faucet. And not to mention that wine rack! 

I still need a backsplash, paint, and to mount the over-the-range microwave. I would like to replace the white and black stove to match the rest of the stainless steel appliances.  I also need to attach the matching hardware onto the new cabinets (I've had it for 11 months). And until my kitchen is painted, the plastic will remain on my appliances.  I would also really like to have the kitchen professionally cleaned since the cabinets still have grut from the previous occupants that I have been unable to clean on my own. 

All in all, I am still just as thankful as I was the day I bought this home.  I still have a few more years to go in this home, so hopefully by the time I move, all of my projects will be completed.


Friday, November 13, 2015

Mercury Glass Pumpkin Jar DIY

Mercury glass is still trendy on Pinterest and I've had a can of mirror spray paint for a while now, but I've been waiting for that perfect project to use it on.  After a stop at Goodwill, I found this pumpkin glass jar (a Dunkin Donuts original from the 80's) for $3.
I wrapped it up with simple supplies I had on hand: tin foil, and a plastic bag - held together by some frog tape.
I first sprayed the inside of the dish with a light mist of water.  Obviously, a lot of the mist collected at the bottom, but I sprayed the looking glass spray paint anyway.  When I was done spraying with the spary paint, I would put the dish upside down to let the moisture come out and to make sure not all the moisture was at the bottom of the dish. I repeated this process about 3 times. (The lid was easier, as I didn't have to flip it upside down).
I let my creation dry and removed the plastic, tin foil, and tape.  It's not perfect, but I think that means I did a good job. 
I was just going to let it hang around for Halloween, but gourds are still festive up until Thanksgiving, so this guy is going to stay for a little while longer. 

Tuesday, October 20, 2015

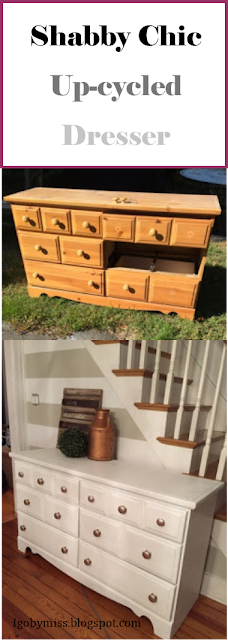
Basic Dresser Remodel DIY

From country pine to shabby chic... Watch how this piece destined for the trash ended up making me money.

When I first acquired this piece from the trash, it was missing a knob, had dog fur inside it (with a slight pet odor), had a partial sticker along the side, drawers needed to be hinged on the tracks correctly, and was knotty pine.


I removed all the drawers and added baking soda to the drawers to absorb some of the slight odor which I later vacuumed out with a shop vac.  I also vacuumed out any dust/debris from the inside/back wall of the dresser.
I then took the old knobs and new knobs and stuck them in an egg carton to be better coated by the rose gold spray paint.  
I looked into buying new knobs, but knobs are very expensive! About $3 each! So I grabbed two double packs of smaller wooden knobs to use on the top drawers so I could move one of the big knobs down to the lower right hand corner where the knob was missing from.  This way the dresser would look symmetrical and the out of pocket expense for the knobs was about $1 each bag and about $6 for the spray paint.  Here they are after their first or second coat.

See the sticker?  I sanded that guy down just enough before I painted over it with my handmade chalk paint.  I store my chalk paint in a clean pickle jar and emptied a little at a time into an old yogurt container which had a wider opening for my brush to stick in.
After 1 coat.

After 1 coat.

Coat 3
Close up of how the knobs looked against the white drawer.

Check out the finished product with a little staging to amp up the shabby chic/farmhouse/imperfect charm.  Posted it online to sell and within less than 24 hours, I had 17 people in line to buy this dresser.  It was gone 2 days later.  The new owners of this dresser are going to use it for a little girl's room with the top of the dresser acting as a changing table.  I wish I was able to salvage old things, give them new life, and sell them every day... but I can't. So I blog about it instead to fill in the gaps.  See you for my next project... Lots of freebies in the works!!

Wednesday, October 14, 2015

Vintage Window DIY

Need a charming piece to tie your home decor together?  Look no further than the trash!  I lucked out and found about 6 of these 8 paned vintage style windows.  

Time: 2 hours
Materials: Window, wire bristle brush, painters tape, white vinegar, paper towels, sanding block, chalk paint, paint brush


As you can see, the windows were very dirty and a little flaky.
I took a bristle brush and brushed away a lot of the flaking paint.  I used my sanding block lightly.  Then I started to clean the window with a white vinegar solution. Look at the top left hand corner pane compared to the others!
Finally clean!
Next, I taped off each pane.  This would have been a lot easier if I used an exacto knife for the corners, but I didn't have one available. 
Then I started painting the front with a white chalk paint.  The paint is Greek Villa by HGTV for LOWEs.  But I made it a chalkboard paint with this recipe that I had leftover from my beautiful french provincial dresser remodel.
All painted.
Peel away tape as soon as you are done painting.  If the paint dries on the tape, the tape may pull the paint when you peel it away.  TIP: If you notice that paint has leaked onto the window... have no worries.  Take a tiny makeup brush and dip it into acetone.  The acetone will remove the paint off of the glass.
I left the back alone because the caulking looked fragile.  I cleaned the back, but didn't paint it.  This was more than me being lazy, it actually keeps the integrity of the vintage/antique feel of the window.
A couple lovely shots of my work inside my home.
Do you see how the light is reflecting off of the clean window panes?  This is a great alternative to a mirror to open up your small spaces.

I am very pleased with this project.  But since I have 5 more windows... I have a a few more ideas up my sleeves (all courtesy of pinterest). Click on the image to go to the pin.